Wishing script in HTML and CSS, Why? For a new blogger, coding is hard. So, they can create a wishing script in HTML and CSS. Because HTML and CSS are much easier than other coding languages. If you aren’t familiar with HTML and CSS, don’t worry.
Don’t go for wishing script download. Learn it, so you can make it as you wish.
I am a new blogger and I want to make a wishing script. But the problem is, I don’t know how to code. Don’t worry man, this post is only for you. We will use HTML for web structure and CSS for design and you know this.
Most bloggers use PHP, JavaScript, and Bootstrap to make a wishing script. The main problem with these languages is not beginner-friendly.
And a newbie only copy-pastes without understanding what will they learn. If you learn something, you can customize and you will make a different one. This is why I have chosen blogger blogger-wishing script but you can start with WordPress.
But wishing script in HTML and CSS, you don’t need to copy, and paste. You can follow me to learn something new. I will show you and tell you step by step to make it easier and more understandable.
Contents
Benefits of wishing scripts
- You are eligible to make more money
- You can drive more traffic to your site
- You can make an App
- You can impress your friends
- You can make different looks for your sites
- You will learn to code
- And so on.
Read: How to Add Email Subscription to WordPress for free
Are you ready? Let’s do this together and make a wishing script in HTML and CSS.
Elements for Wishing script in HTML and CSS
Note: You can create wishing script for bloggers in the same way.
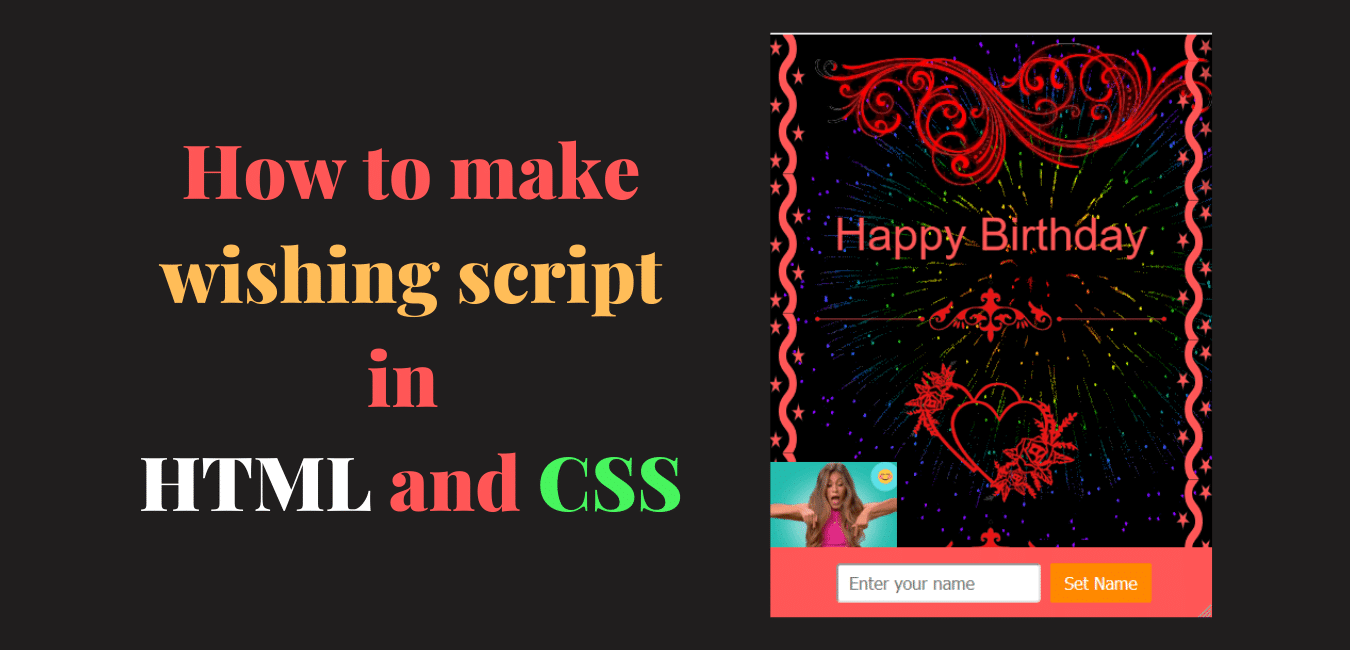
Before starting script design you have to download design elements. For the top section, left and right bar, middle bar, background image or gif, and main image.
For example, I have used elements and images that you can see in the image.

You can download it easily by using Google search. Open Google and search like “script divider design/script design elements, etc” and you will get the results. With the wishing script in HTML and CSS, you can be more attractive.

You can direct download or you can take screenshots. For background, download the gif file. Because gif files will give an attractive look to your wishing script. Your GIF will look like this.

Tool for wishing script in HTML and CSS
Sublime text is one of the best coding tools. This tool provides automatic fill-up opportunities. For a newbie, this is a great opportunity to have an automatic fill-up option. You can download sublime text just by clicking here.
What next?
HTML part one
<!DOCTYPE html>
<html>
<head>
	<meta charset="utf-8">
	<title>Wishing script in HTML and CSS</title>
</head>
<body>

</body>
</html>
This is a very basic structure of HTML. <head> tag is used for links and browser tasks. <title> tag is used to give the title of your document. Everything that you want to show, you will write in the <body> tag.
HTML part two
Now open sublime text and start coding with me. After opening sublime text press “ctrl+s” to save and give the file name with the .html extension.
Come back to your sublime text and paste the code in the <head> tag that I have written below section.
<head>

	<meta http-equiv="Content-Type" content="text/html" charset="utf-8">
	<meta http-equiv="X-UA-Compatible" content="IE=edge" />
	<meta name="viewport" content="width=device-width, initial-scale=1.0, maximum-scale=1.0, user-scalabe=no" />
	<meta name="HandheldFriendly" content="true" />
	<link rel="stylesheet" type="text/css" href="css/style.css" />

	<title>Wishing script</title>
</head>
- The first and second meta is to support your script on every browser and are compatible.
- The third meta will stop the user from changing the image position.
- Forth meta for user-friendly
- The fifth will connect your CSS with HTML
There are so many means for those meta tags but for a beginner those 4 are the best that I have written here.
In the <title> tag you can use your own title that you want to use. Our <head> tag is complete now. Let’s move on <body> section.
Before jumping on <body> let’s create a CSS file. In the sublime text, you can open multiple tabs. To do that, click on View and move your cursor to the layout. You will see single, columns:2, columns:3, and many more.

If you click on column 2 your sublime text will open two tabs. Use one for HTML and another one for CSS. Click on your second tab and press “ctrl+s”.
Your CSS file name should be style.css because .css is the CSS file extension. So, you can give any name but your extension will be .css
Again back to the sublime text to write CSS. And paste this code on your CSS area.
CSS part one
html,body{
	margin: 0;
	padding: 0;
}
This code will set your script margin and padding to 0.
HTML part three
Now back to HTML and paste this code. Don’t worry, I will discuss it with you.
<body>
<img src="input your image url or direction, this is top image section" />
<div class="header-title">
	Happy Diwali
</div>
<div class="first-divider">
	<img src="input your devider url or direction" />
</div>
<div class="center">
	<img src="input your image url or direction which you want to enter">
</div>
<div class="second-divider">
	<img src="input your devider url or direction" />
</div>
<div class="main-image">
	<img src="input your devider url or direction">
</div>
<div class="wish">
	          <p>Have a happy and safe Diwali. May your Diwali be free from darkness and abundant with light. Have a fun and festive Diwali! Hoping your Diwali brings health, wealth, and happiness.</p>
	<img src="input your devider url or direction" />
</div>
<div class="second-image">
	<img src="input your devider url or direction" class="animated pulse infinite" />
</div>
<div class="footer">
	<div class="hello">
		<img src="input your gif file url or direction" />
	</div>
	<input id="username" name="username" placeholder="Enter your name" />
	<button type="Submit" id="butt">
		Set Name
	</button>
</div>
<div class="left-scroll"></div>
<div class="right-scroll"></div>
</body>
Under the body tag, you can see I have used the <img /> tag. But here I didn’t enter any image URL or destination. Your images and CSS files will be in a different folder.
You need to create your image and CSS file folder in the same directory. Just like this image.

Here your CSS file folder, images file folder, and your HTML are in the same directory and you have to do this.
So, this line
<img src="input your image url or direction, this is top image section" />
will be like this.
<img src="images/wishing_script-removebg-preview.png" />
src means your file destination, where your file should be. My image is in the image file. When your file is into another folder then you need to enter / and enter the file name as I entered here.
The structure will be “<img src=”your image folder name/your image file name” />
Are you clear here? Let’s see the next.
CSS part two
Wishing script in HTML and CSS, that we are showing you step-by-step. Hope you are understanding well.
Don’t hesitate to comment on your problem with the Wishing script in HTML and CSS. We will try our best to solve your best.
In our CSS, you will see the dot(.) and hash(#) because in CSS dot represents the class and # represents the id. As you can see we have used so many classes and two or three ids in the HTML section.
<style>
@import url('https://fonts.googleapis.com/css2?family=Ewert&family=Roboto&display=swap');
</style>

html,body{
	margin: 0;
	padding: 0;
}

body{
	background-color: #FF0000;
	padding-left: 35px;
	padding-right: 35px;
	text-align: center;
	background-image: url("../images/438713750c56584a3f3d5c01927bb76d.gif");
}

.header-title{
	font-family: 'Ewert', cursive;
    font-family: 'Roboto', sans-serif;
	font-size: 43px;
	color: #ff5757;
	padding: 5px;
	animation: heartBeat 2s infinite;
}

.first-divider{
	margin: 5px 0;
}

.first-divider img{
	max-width: 100%;
	height: auto;
}

.center{
	margin: 5px 0;
}

.center img{
	max-width: 50%;
	height: auto;
}

.second-divider{
	margin: 5px 0;
}

.second-divider img{
    max-width: 100%;
	height: auto;
}

.main-image{
	margin: 5px 0;
}

.main-image img{
	max-width: 100%;
	height: auto;
}

.wish{
    font-family: 'Ewert', cursive;
    font-family: 'Roboto', sans-serif;
	background-color: #ff5757;
	padding: 20px 15px;
	font-size: 20px;
	color: #000;
	margin: 30px 0 50px 0;
}

.wish img{
	max-width: 100%;
	height: auto;
	margin: 5px 0;
}

.second-image img{
    max-width: 100%;
	height: auto;
	margin: 5px 0;
}

.second-image img{
	margin: 50px 0;
}

.footer{
	position: fixed;
	left: 0;
	bottom: 0;
	height: 50px;
	background-color: #ff5757;
	width: 100%;
	padding: 15px 10px 2px 3px;
	z-index: 1000;
}

#username{
	height: 25px;
	border-radius: 4px;
	padding: 4px 10px;
	font-size: 16px;
	margin-right: 5px;
}

#butt{
	padding: 9px 13px;
	font-size: 16px;
	background-color: #f80;
	color: #fff;
	border: 0;
	border-radius: 2px;
}

.left-scroll{
	position: fixed;
	top: 0;
	left: 0;
	min-height: 100%;
	width: 35px;
	background: transparent url("../images/siddebar1.png");
	animation: 10s linear scroll-img infinite;
}

@keyframes scroll-img{
	from{
    background-position: 100% 100%;
	}
	to{
    background-position: 0 0;
	}
}

.right-scroll{
	position: fixed;
	top: 0;
	right: 0;
	min-height: 100%;
	width: 35px;
	background: transparent url("../images/siddebar1.png");
	transform: rotate(180deg);
	animation: 10s linear scroll-img infinite;
}

.hello{
	position: absolute;
	top: -80px;
	left: 0;
}
Very fast you will see this CSS code, actually, these are Google fonts that are imported from Google.
<style>
@import url('https://fonts.googleapis.com/css2?family=Ewert&family=Roboto&display=swap');
</style>
For the title and paragraph, I have used this Google font. If you want, you can choose another one. To do this click here. Select your favorite one and then click on the select this style and import.

When you want to change the font style then you need to enter the “font-family” CSS rules.
In the body section, I have added a background image. You can add background images in HTML and CSS. I have done both.
Want to know about Affiliate Marketing on Facebook? Check here.
Let’s see, how you can do this with the help of CSS.
body{
	background-image: url("../images/438713750c56584a3f3d5c01927bb76d.gif");
}
As you have seen we have made a different folder for images. That was just under the CSS folder. I have been told for the same route directory we have to pass / and we have to pass a dot for every folder.
So the structure will look like this
body{
	background-image: url("for every forlder pass dot, in my case I have to pass two dots (..)/folder name/your file name");
}
Look at the header title section in the CSS. You will see, that we have added animation here. For the first time, maybe this code will be hard for you. No man, it’s easy.
How to add animation
.header-title{
	animation: heartBeat 2s infinite;
}
Animation requires CDN, you are a newbie and you don’t need to do that. For that, we are going to do that with the help of a link.
To add animation to your script click here and copy the link that we have marked. Copy that and paste it into your <head> tag.

Your <head> tag will look like this
<head>
	<meta http-equiv="Content-Type" content="text/html" charset="utf-8">
	<meta http-equiv="X-UA-Compatible" content="IE=edge" />
	<meta name="viewport" content="width=device-width, initial-scale=1.0, maximum-scale=1.0, user-scalabe=no" />
	<meta name="HandheldFriendly" content="true" />
	<link rel="stylesheet" type="text/css" href="css/style.css" />
	<link rel="stylesheet" href="https://cdnjs.cloudflare.com/ajax/libs/animate.css/4.1.1/animate.compat.min.css" integrity="sha512-b42SanD3pNHoihKwgABd18JUZ2g9j423/frxIP5/gtYgfBz/0nDHGdY/3hi+3JwhSckM3JLklQ/T6tJmV7mZEw==" crossorigin="anonymous" referrerpolicy="no-referrer" />
	<title>Wishing script</title>
</head>
You have added a CDN link and you are eligible to show animation on your script. It’s time to choose the animation style. To select the style click here and choose your favorite one from attention seekers.

In our case, we have added heartBeat. Here 2s will finish within 2s and infinite set the command as all-time running. Hey, are you clear?
To add the WhatsApp button to your script copy this HTML and CSS code and paste it into your HTML and CSS section.
Add this HTML code to your <head> tag
<link rel="stylesheet" href="https://maxcdn.bootstrapcdn.com/font-awesome/4.5.0/css/font-awesome.min.css">
<a href="https://api.whatsapp.com" class="float" target="_blank">
<i class="fa fa-whatsapp my-float"></i>
</a>
And change your <footer> section by this code
<div class="footer">
	<div class="hello">
		<img src="enter your footer gif image url or destinaton" />
<h3 class="hello1">Share on WhatsApp</h3>
</div>
</div>
Now it’s time to apply CSS to your CSS section.
In your CSS section, replace #username and #butt and paste this CSS.
.hello{
	position: absolute;
	top: -80px;
	left: 0;
}

.hello1{
position: absolute;
color: #3EEC71;
top: 71px;
left: 113px;
animation: zoomIn 2s infinite;
}

.float{
position: fixed;
width: 60px;
height: 60px;
bottom: 4px;
right: 80px;
background-color: #25d366;
color: #FFF;
border-radius: 50px;
text-align: center;
font-size: 30px;
box-shadow: 2px 2px 3px #999;
z-index: 1001;
}

.my-float{
	margin-top:16px;
}
We are done here. It’s your time to do a revision. If you face any problem with margin and padding then you can solve your problem by just commenting or you can watch YouTube videos.
Bonus points
Another great option for designing is inspection. To open, right-click on a specific area and then click on inspect.

In our wishing script in HTML and CSS, you don’t need to be a coding master. Just follow us and you can create yours. The wishing script in HTML and CSS doesn’t require any master skills.
The wishing script in HTML and CSS gives a great opportunity to make a wishing script for a Newman. So, do you love writing scripts in HTML and CSS?
If you are willing to create wishing script for blogger then the same principle will be applicable.
Hope you have done all the steps without creating any issues. If you have any issues or problems then feel free to comment on your problem.
We will help you as soon as possible.
Thank you for sharing this. Love it.